22 KiB
Installing Red Hat OpenShift on VMware vSphere
In the previous day one of the areas covered was the available installation methods for Red Hat OpenShift. In this guide, I am going to detail the IPI method, where by the installation software deploys the necessary infrastructure as part of the cluster deployment. You will see that even with this method, we still get a lot of control around the deployment of our cluster.
The platform for this example will be VMware vSphere, the popular hypervisor virtualisation platform available for your datacenter and public cloud environments.
Pre-requisites
We will need the following:
- Jump host to run the installation software from
- Access to the DNS server which supports the infrastructure platform you are deploying to
- A pull secret file/key from the Red Hat Cloud Console website
- You can get one of these by just signing up for an account, any cluster created using this key will get a trial activation for a cluster for 60 days
- A SSH Key used for access to the deployed nodes
Configuring the Jump host Machine
For this example, I've used a Ubuntu Server Virtual Machine, you can use another distribution of Linux or Mac OS X for these steps. (Note: the OpenShift-install CLI tool only supports Linux and MAC OS X)
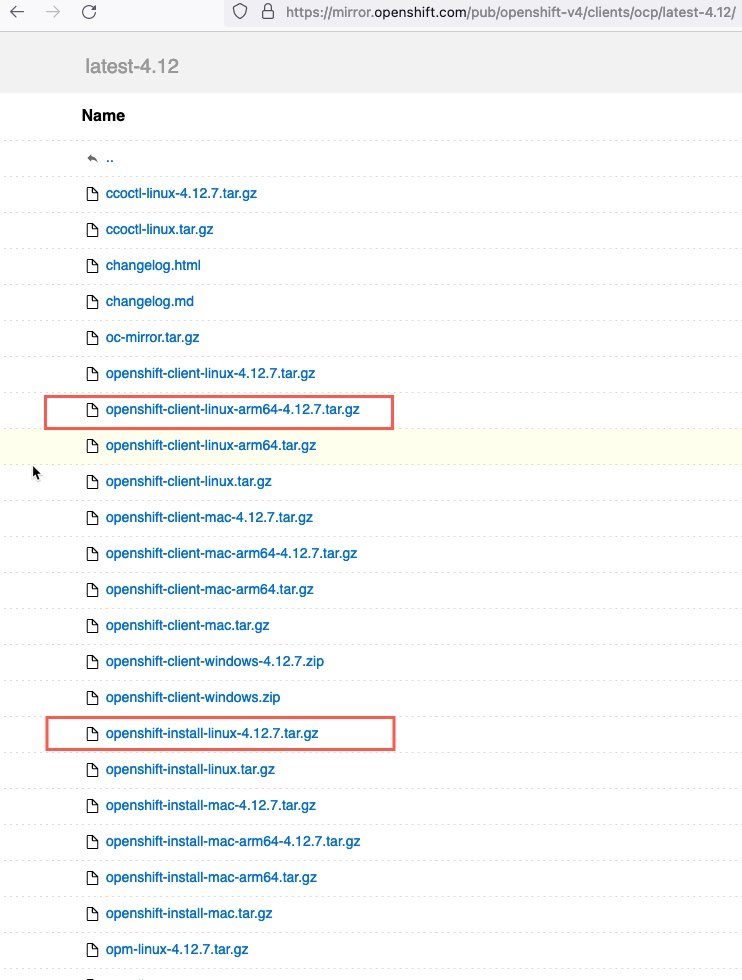
Download the OpenShift-Install tool and OpenShift-Client (OC) command line tool. (I’ve used version 4.12.6 in my install)
Extract the files and copy to your /usr/bin/local directory
tar -zxvf openshift-client-linux.tar.gz
tar -zxvf openshift-install-linux.tar.gz

sudo cp openshift-install /usr/bin/local/openshift-install
sudo cp oc /usr/bin/local/oc
sudo cp kubectl /usr/bin/local/kubectl
Have an available SSH key from your jump box, so that you can connect to your CoreOS VMs one they are deployed for troubleshooting purposes. Generate one using ssh-keygen if needed.
Next, we need to download the VMware vCenter trusted root certificates and import them to your Jump Host.
curl -O https://{vCenter_FQDN}/certs/download.zip
Now unzip the file (you may need to install a software package for this sudo apt install unzip), and import them to the trusted store (ubuntu uses the .crt files, hence importing the win folder).
unzip download.zip
cp certs/win/* /usr/local/share/ca-certificates
update-ca-certificates
You will need a user account to connect to vCenter with the correct permissions for the OpenShift-Install to deploy the cluster. If you do not want to use an existing account and permissions, you can use this PowerCLI script to create the roles with the correct privileges based on the Red Hat documentation.
Configuring DNS Records
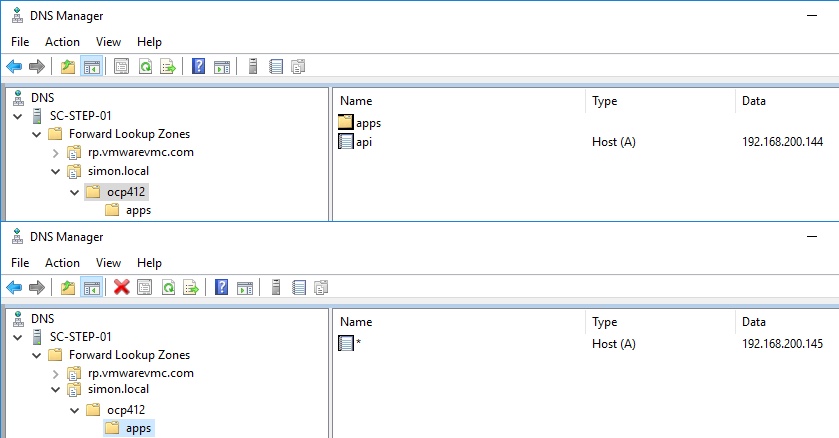
A mandatory pre-req is DNS records. You will need the two following records to be available on your OpenShift cluster network in the same IP address space that your nodes will be deployed to. These records will follow the format:
    {clusterID}.{domain_name}
        example: ocp412.veducate.local
    *.apps.{clusterID}.{domain_name}
        example: *.apps.ocp412.veducate.local
If your DNS is a Windows server, you can use this script here. I've included a quick screenshot of my DNS Server settings below for both records.
Minimum Resources to deploy a cluster
You need to be aware of the minimum deployment options to successfully bring up a cluster.
    1 Bootstrap
        This machine is created automatically and deleted after the cluster build.
    3 Control Plane
    2 Compute Plane
Using the OpenShift-Install tool
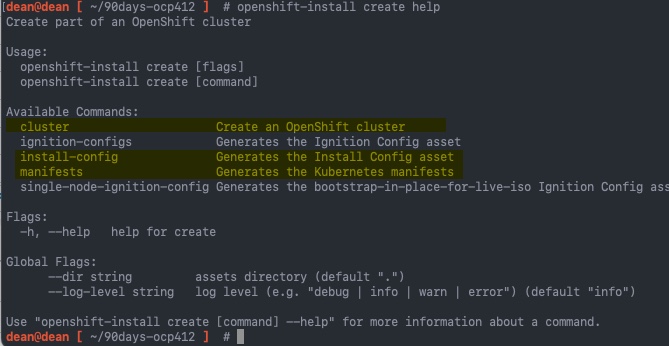
Now that we have our pre-reqs in place, we can start to deploy our cluster. When using the OpenShift-Install tool, you have three main command line options when creating a cluster
openshift-install create cluster
- This will run you through a wizard to create the install-config.yaml file and then create the cluster automatically using terraform which is packaged as part of the installer software (meaning you don't need terraform on your system as a pre-req).
- If you run the below two commands listed, you can then still run this command to provision your cluster.
openshift-install create install-config
- This will run you through a wizard to create the install-config.yaml file, and leave it in the root directory, or directory you specify with the --dir= argument.
- It is supported for you to modify the install-config.yaml file, before running the above
create clustercommand.
openshift-install create manifests
- This will create the manifests folder which controls the provisioning of the cluster. Most of the time this command is only use with UPI installations. However some platform integrations support IPI installation, such as VMware's NSX Advanced Load Balancer, but they require you create the manifest folder and upload adding YAML files to this folder, which helps OpenShift integrate to the Load Balancer upon deployment..
There are other commands such as create ignition which would be used for when you are performing the UPI installation method.
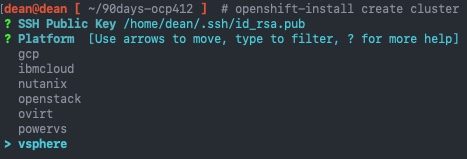
Now let's jump into creating our cluster in the easiest possible way, with the openshift-install create clustercommand and press enter, this will take you into the wizard format. Below I've selected my SSH key I want to use and the Platform as vSphere.
Next I enter the vCenter FQDN, the username, and password. The tool then connects to the vCenter and pulls the necessary datastores and networks I can deploy to. If you have missed the certificate step above, it will error out here.
After selecting datastore and the network, I need to now input the address for:
api.{cluster_name}.{base_domain} *.apps.{cluster_name}.{base_domain}
However I hit a bug (GitHub PR,Red Hat Article) in the installer, where by the software installer is hardcoded to only accept addresses in the 10.0.0.0/16 range.
The current work around for this is to run openshift-install create install-config provide ip addresses in the 10.0.0.0/16 range, and then alter the install-config.yaml file manually before running openshift-install create cluster, which will read the available install-config.yaml file and create the cluster (rather than presenting you another wizard).
So, let's back track a bit, and do that. Running the create install-config argument, provides the same wizard run through as before.
In the wizard, I've provided IP's on the range from above, and set my base domain and cluster name as well. The final piece is to paste in my Pull Secret from the Red Hat Cloud console.
Now if I run ls on my current directory I'll see the install-config.yaml file. It is recommended to save this file now before you run the create cluster command, as this file will be removed after this, as it contains plain text passwords.
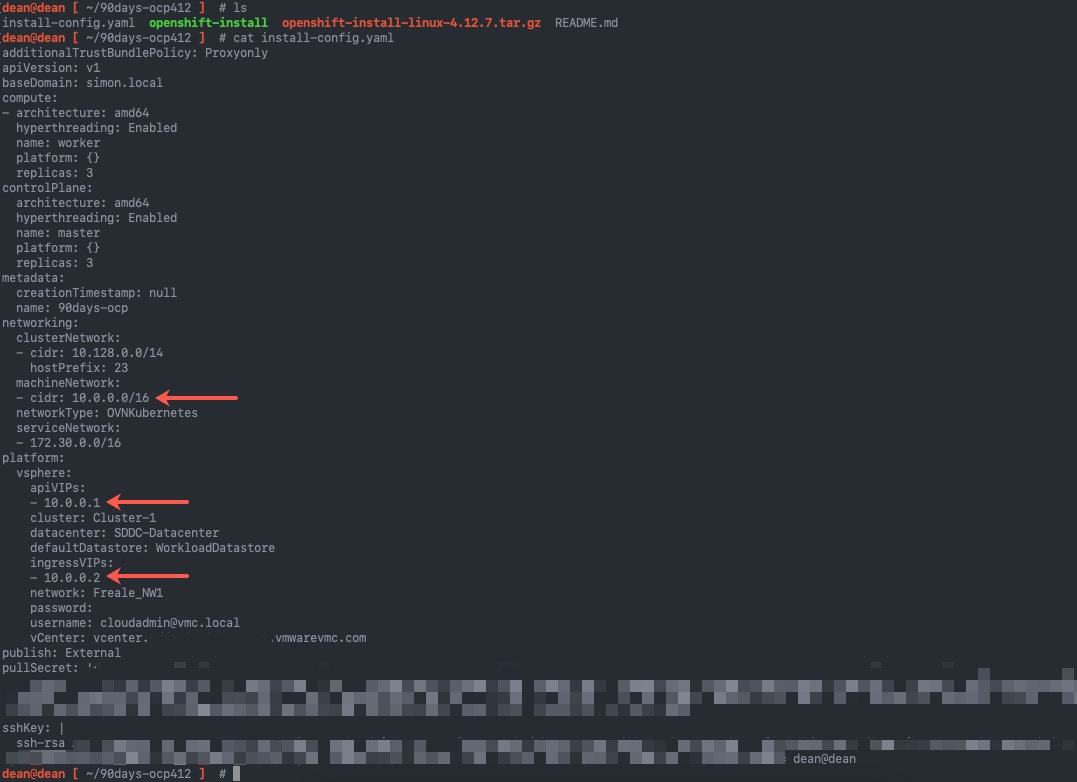
I've highlighted in the below image the lines we need to alter.
For the section
  machineNetwork:
  - cidr: 10.0.0.0/16
This needs to be changed the network subnet the nodes will run on. And for the platform section, you need to map the right IP addresses from your DNS records.
platform:
  vsphere:
    apiVIP: 192.168.200.192 <<<<<<< This is your api.{cluster_name}.{base_domain} DNS record
    cluster: Cluster-1
    folder: /vEducate-DC/vm/OpenShift/
    datacenter: vEducate-DC
    defaultDatastore: Datastore01
    ingressVIP: 192.168.200.193 <<<<<<< This is your *.apps.{cluster_name}.{base_domain} DNS record
I've also included a further example of a install-config.yaml file, I want to highlight under the "compute" and "controlPlane" sections, where by I've specified resouce configuration settings for my virtual machines. You cannot change these below the minimum specified in the documentation, otherwise you will your cluster will not build successfully.
You can read about further supported customizations here.
apiVersion: v1
baseDomain: veducate.local
compute:
- hyperthreading: Enabled
  name: worker
  replicas: 1
  platform:
    vsphere:
      cpus: 8
      coresPerSocket: 4
      memoryMB: 16384
      osDisk:
        diskSizeGB: 120
controlPlane:
  hyperthreading: Enabled
  name: master
  replicas: 3
  platform:
    vsphere:
      cpus: 8
      coresPerSocket: 4
      memoryMB: 16384
      osDisk:
        diskSizeGB: 120
metadata:
  creationTimestamp: null
  name: ocp48
networking:
  clusterNetwork:
  - cidr: 10.128.0.0/14
    hostPrefix: 23
  machineNetwork:
  - cidr: 10.0.0.0/16
  networkType: OpenShiftSDN
  serviceNetwork:
  - 172.30.0.0/16
platform:
  vsphere:
    apiVIP: 192.168.200.192
    cluster: Cluster-1
    folder: /vEducate-DC/vm/OpenShift/
    datacenter: vEducate-DC
    defaultDatastore: Datastore01
    ingressVIP: 192.168.200.193
    network: "network_NW1"
    password: Password@!
    username: admin@veducate.local
    vCenter: vcenter.veducate.local
publish: External
pullSecret: '{"auths":{"cloud.openshift.com":{"auth":"bxxxxxx==","email":"openshift@veducate.co.uk"},"registry.redhat.io":{"auth":"Nxxx=","email":"openshift@veducate.co.uk"}}}'
sshKey: |
  ssh-rsa AAAABxxxxxx openshift@veducate
Now that we have our correctly configured install-config.yaml file, we can proceed with the installation of the cluster, which after running the openshift-install create cluster command, is hands off from this point forward. The system will output logging to the console for you, which you can modify using the --log-level= argument at the end of the command.
Below is the normal output without any modifiers. We now have a working Red Hat OpenShift Cluster, and can use the export command provided to access the cluster via the oc CLI tool, or you can use kubectl
dean@dean [ ~/90days-ocp412 ]  # ./openshift-install create cluster
INFO Consuming Install Config from target directory
INFO Creating infrastructure resources...

INFO Waiting up to 20m0s (until 9:52AM) for the Kubernetes API at https://api.90days-ocp.simon.local:6443...
INFO API v1.25.4+18eadca up
INFO Waiting up to 30m0s (until 10:04AM) for bootstrapping to complete...
INFO Destroying the bootstrap resources...
INFO Waiting up to 40m0s (until 10:30AM) for the cluster at https://api.90days-ocp.simon.local:6443 to initialize...
INFO Checking to see if there is a route at openshift-console/console...
INFO Install complete!
INFO To access the cluster as the system:admin user when using 'oc', run 'export KUBECONFIG=/home/dean/90days-ocp412/auth/kubeconfig'
INFO Access the OpenShift web-console here: https://console-openshift-console.apps.90days-ocp.simon.local
INFO Login to the console with user: "kubeadmin", and password: "ur6xT-gxmVW-WVUuD-Sd44J"
INFO Time elapsed: 35m16s
Viewing the installation logs
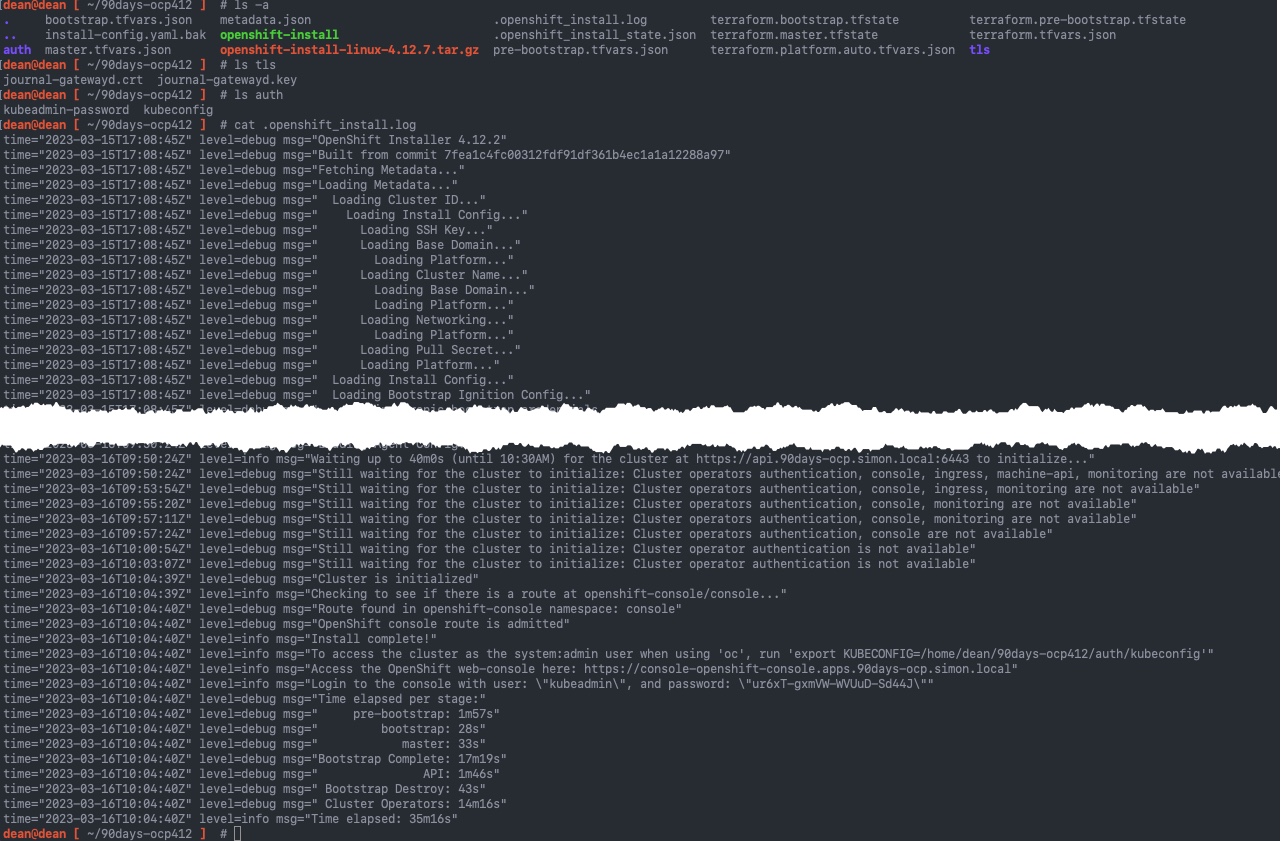
If we now look within our directory where we ran the openshift-install installation from, you can see a number of new folders and files are created:
- auth Folder
- Within this folder is your kubeconfig file, as mentioned in the above console output
- tls Folder
- this contains the certificates of the journal-gateway service on the nodes to collect logs and debug
- Terraform files
- There are various
.tfvarsand.tfstatefiles used by the terraform component which is part ofopenshift-installsoftware, and well as the output Terraform state file.
- There are various
- Log Files
- Finally the verbose output is located in the hidden file
.openshift_install.log, this contains all the details about your installation and the running of Terraform to create the various resources.
- Finally the verbose output is located in the hidden file
Below is a screenshot showing the directory, folders and example of my logging output.
Connecting to your cluster
To communicate with your cluster, like a vanilla Kubernetes environment, you can interact via the CLI tooling or directly with the API. However with Red Hat OpenShift, you also get a web console out of the box as well, this web console is designed for both personas, the platform administrator, and the developer who is deploying their applications. There is actually a drop down to change between these persona views as well (If you have the appropiate permissions to see both interfaces).
Using the Openshift Client (oc) and Kubectl
Aa you will have seen from the final output of the installation, you will be provided a kubeconfig file in the auth folder, and the ouput provides you the necessary command to start consuming that straight away, as per the below example.
INFO To access the cluster as the system:admin user when using 'oc', run 'export KUBECONFIG=/home/dean/90days-ocp412/auth/kubeconfig'
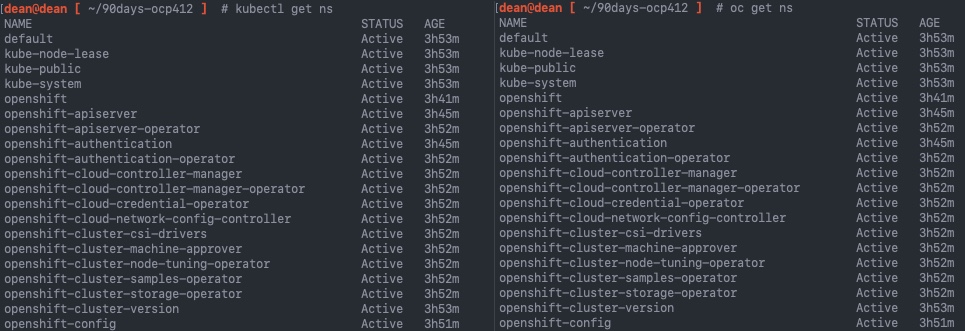
Once set as your environment variable, you can now interact with the cluster the same way you would with a vanilla Kubernetes cluster. When using the OpenShift Client (oc) tool, you'll find that all of your favourite kubectl commands will still work, you just replace the first part of the command with oc. Below I've detailed a few examples:
kubectl get ns
oc get ns

kubectl get pods -A
oc get pods -A


kubectl get pods -n openshift-apiserver
oc get pods -n openshift-apiserver


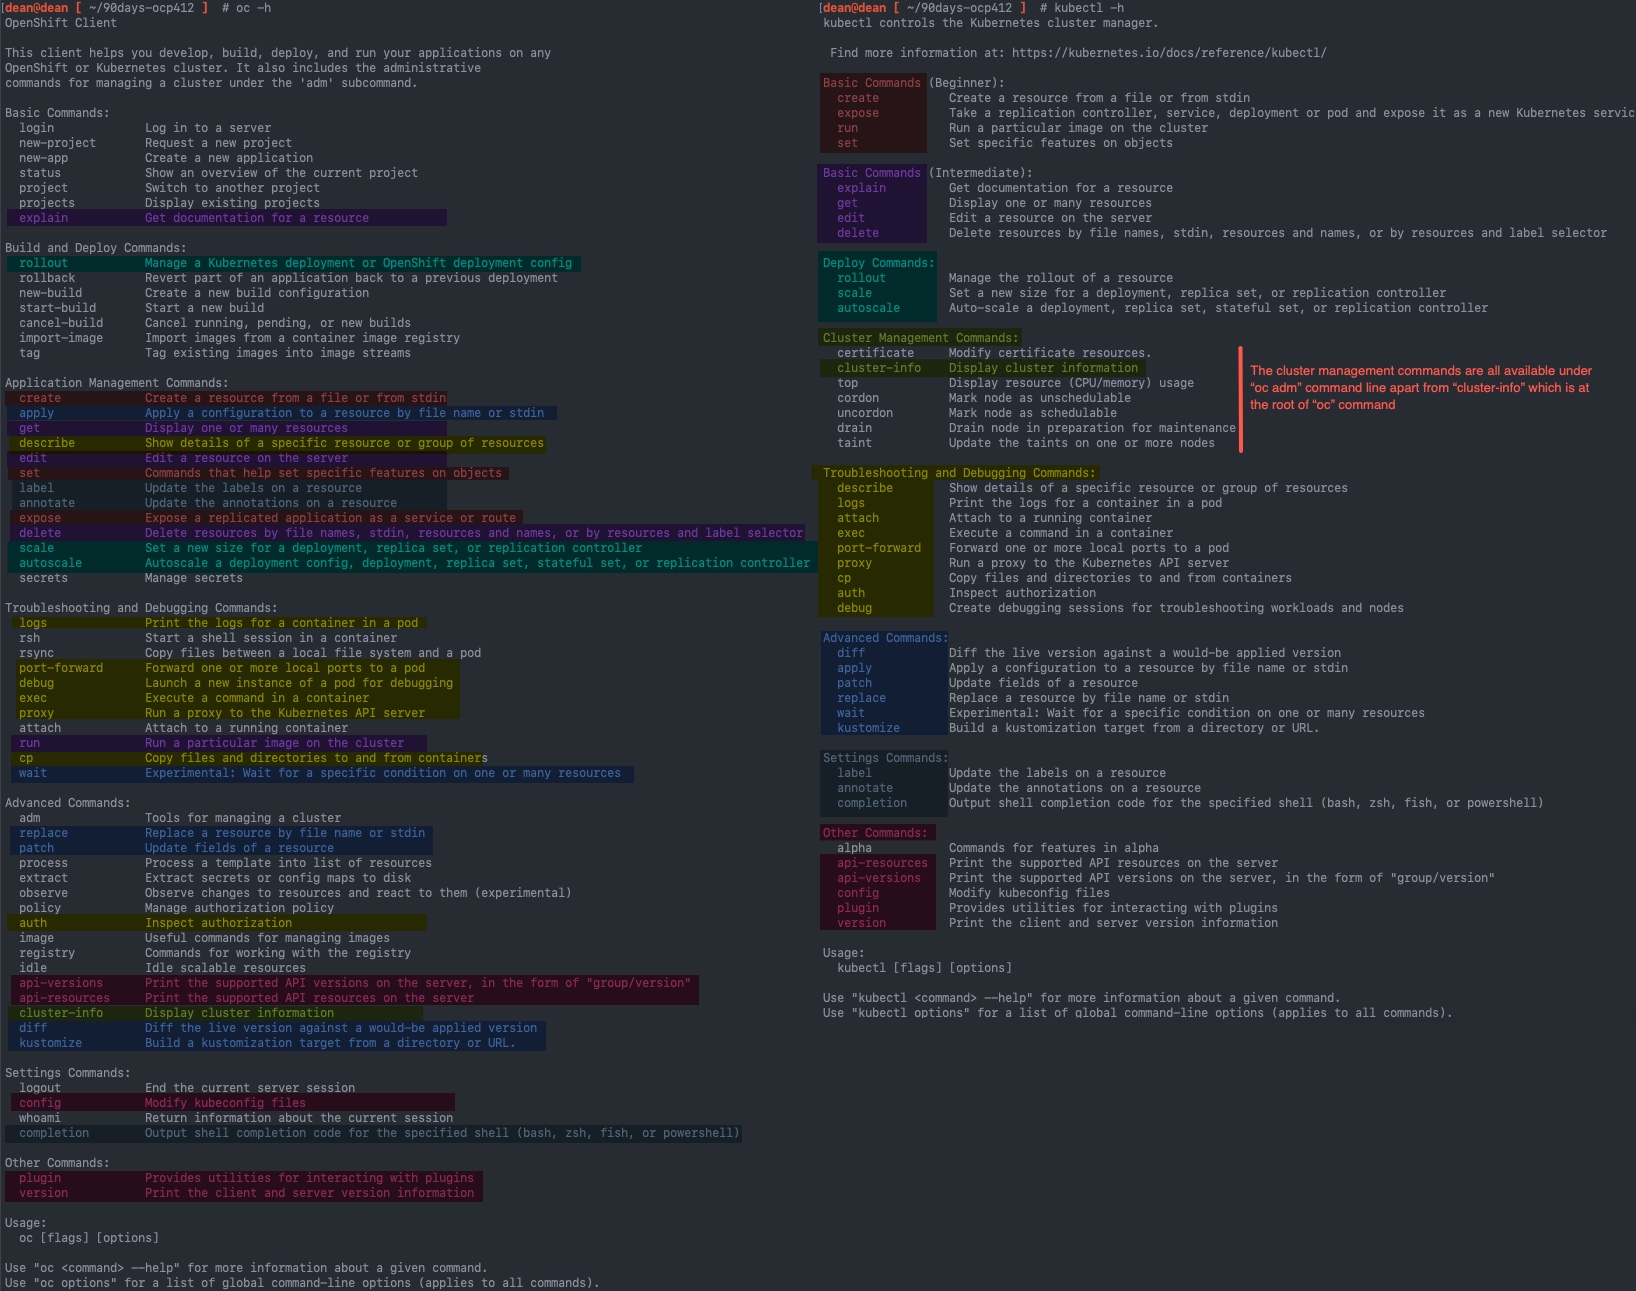
 I've created an image of the output from
 oc -help and kubectl -help and mapped the two commands together, you will see that the oc tool is far more rich in terms of functionality
You can also login into the OpenShift cluster via the oc login command.
# Log in to the given server with the given credentials (will not prompt interactively)
oc login localhost:8443 --username=myuser --password=mypass
A final footnote here, if you are not planning on using an image registry in your environment, it recommended to run this command to use the inbuilt registry as ephemeral whilst you do your testing:
oc patch configs.imageregistry.operator.openshift.io cluster --type merge --patch '{"spec":{"managementState":"Managed","storage":{"emptyDir":{}}}}'
Using the OpenShift Console UI
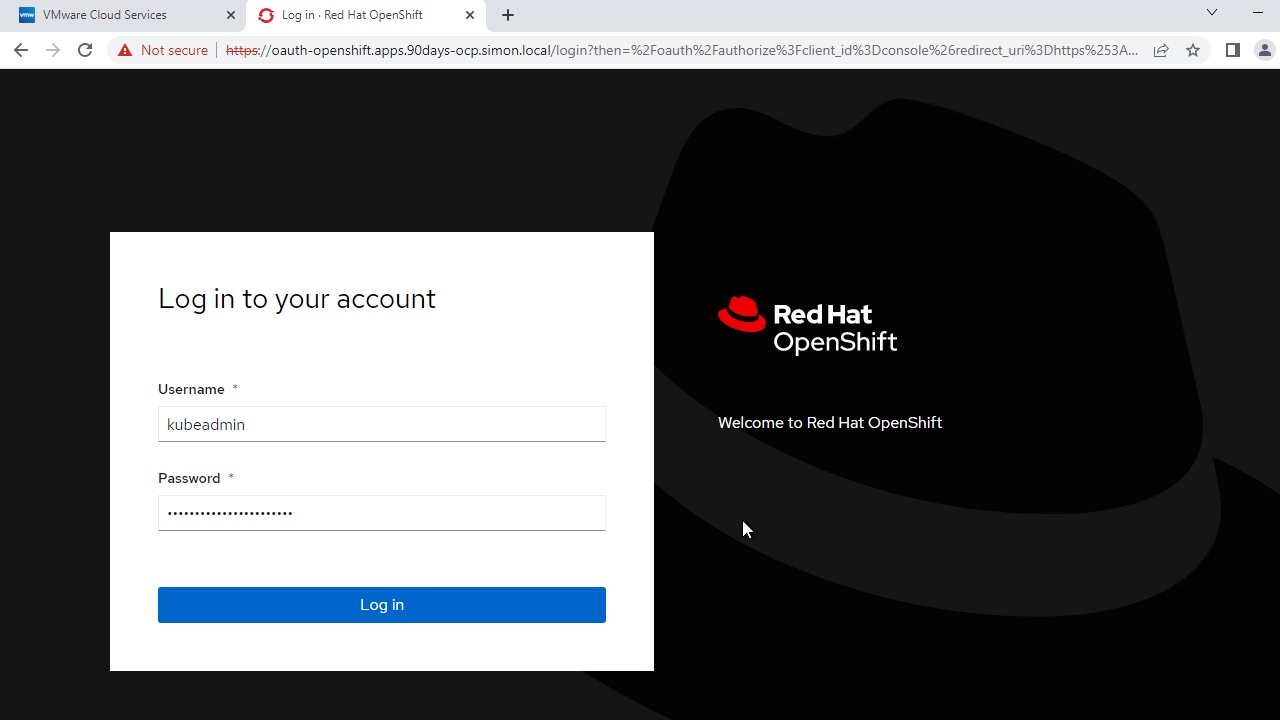
The final access point into the cluster, is via the UI, again the output of the installation software, gives you the full FQDN to access this console, if you look closely you'll see it uses the ingress record under *.apps.{cluster_name}.{base_domain}.
INFO Access the OpenShift web-console here: https://console-openshift-console.apps.90days-ocp.simon.local
INFO Login to the console with user: "kubeadmin", and password: "ur6xT-gxmVW-WVUuD-Sd44J"
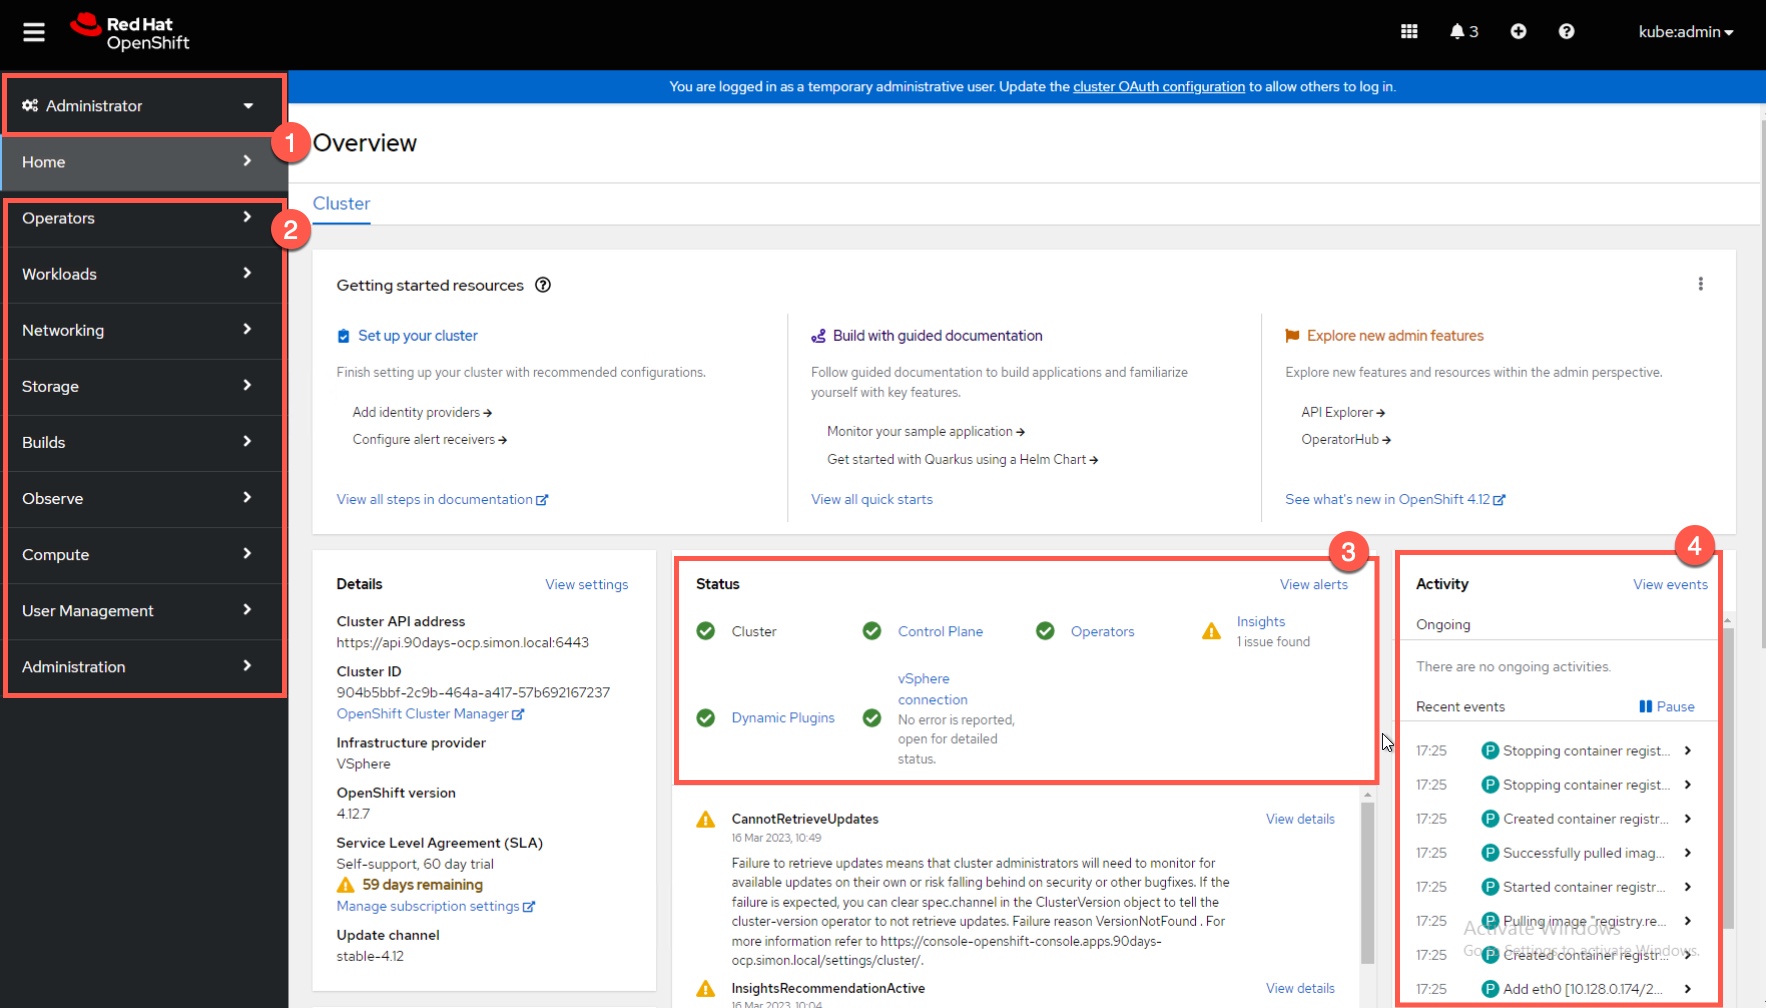
Once logged in, you'll view the persona that you have access to (1). In my example, I'm using the kubeadmin account, so I see the administrative view first, and I can change this to the Developer view as well (see second screenshot).
Under the left-hand navigation pane (2), you can easily browse all the common areas for platform administration, and view details of the live cluster, as well as make changes to existing configurations, or commit new configurations.
In the middle (3) we have an overall status of the cluster, and connectivity to update services, and Red Hat cloud services such as their Insights feature. An activity log flanks the far right-hand side (4) of all the events in the system. Clicking any of these will take you into the object they are related to for further details. If it's about a pod, you then can see the logs from each container that runs within the pod.
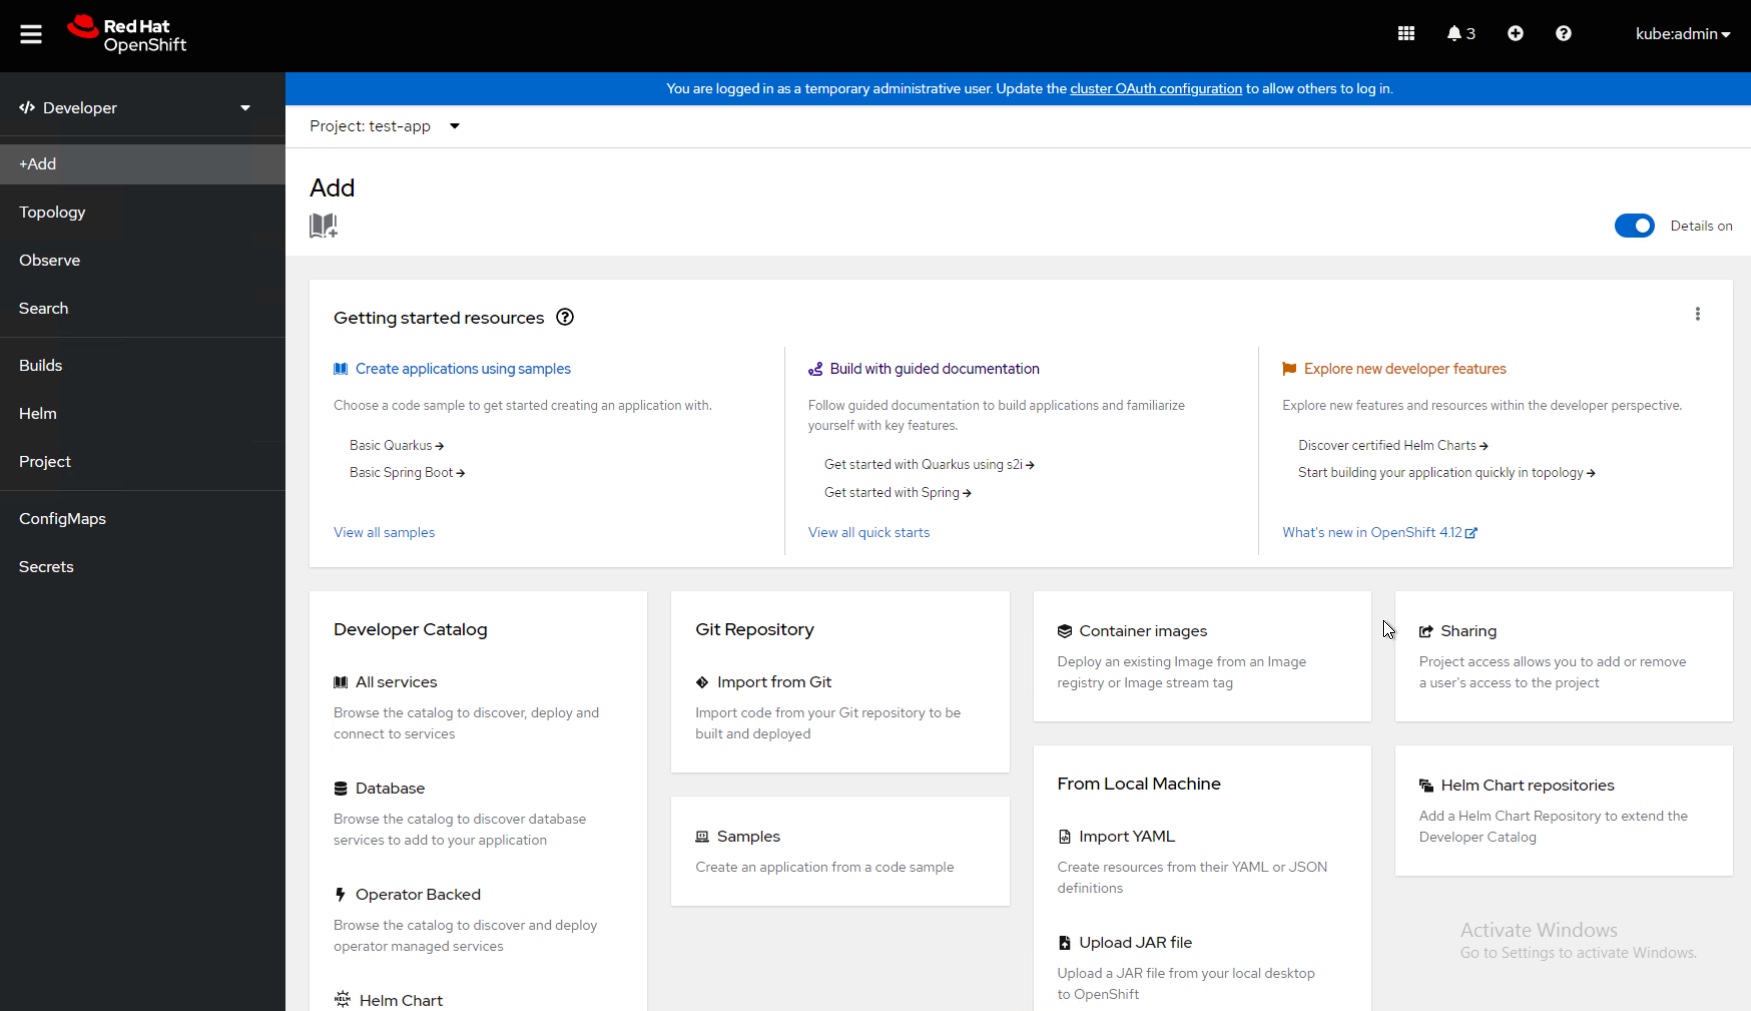
Clicking the Administrator word in the top left-hand side (above screenshot, 1), you can switch to the Developer mode, which you can see below.
On the the developer homepage screen, you can see straight away you are presented with a rich-deployment options to get up and running, you can deploy Kubernetes Operators for services, Helm Charts, import code from Git which can be built into a container by the cluster, deploy app samples, bring in individual containers, import content from your local machine, and control who can access your projects (Kubernetes namespaces with more features added in).
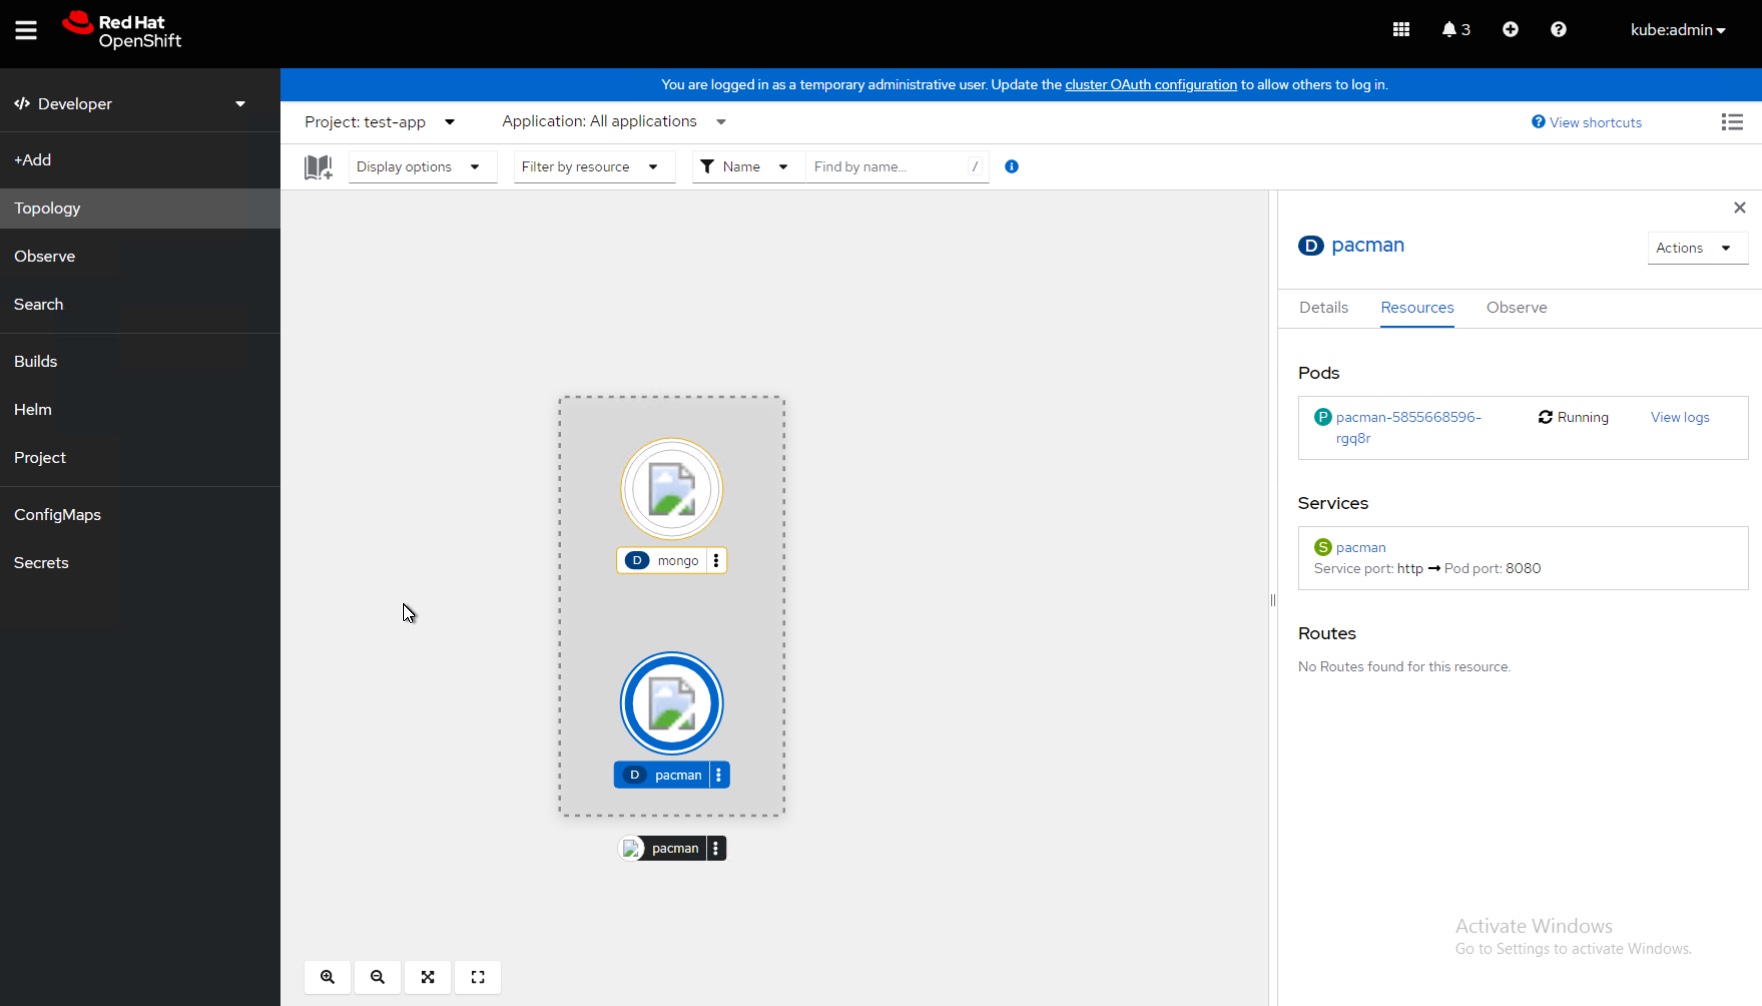
For this example today, I deployed my trusty pacman app from the Helm Chart hosted on GitHub, unfortunately I've not configured images for the app, but you can see, a topology is built, I can click into each component and see information about it.
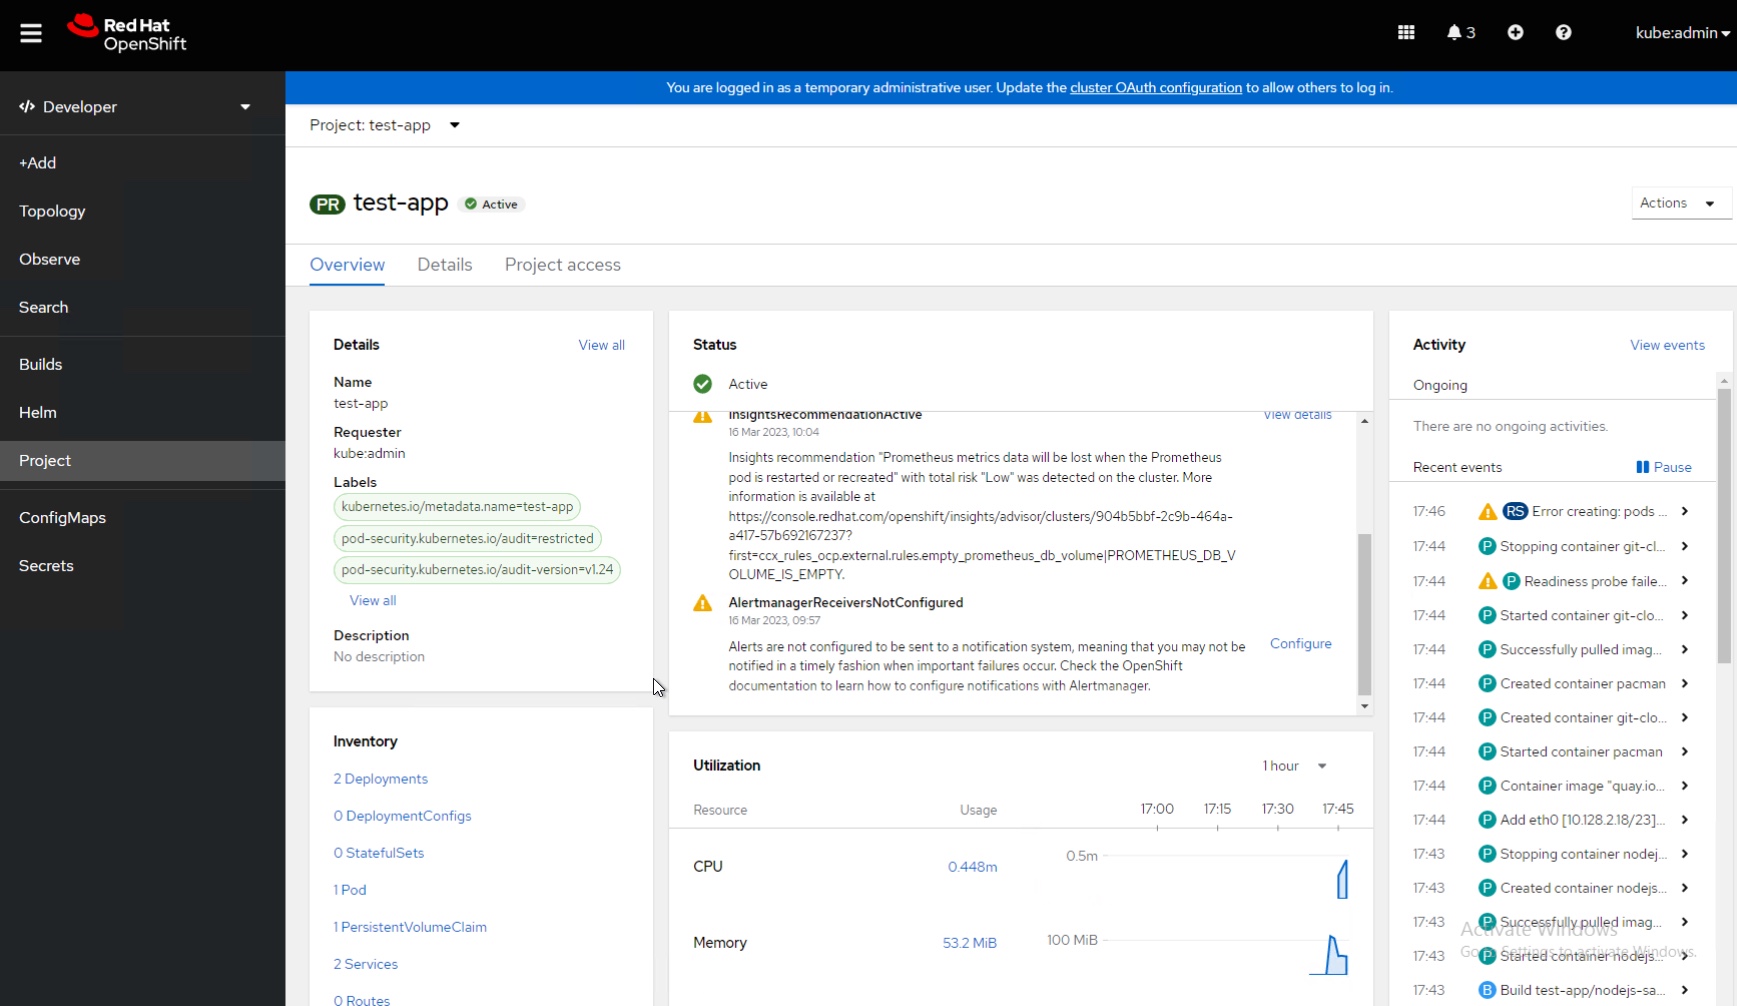
If I take a step back I also can look at my project as a whole, see resource utilization, and events in my project, as well as control access for other developers to collaborate with me.
Summary
I think I'll stop here and wrap up. As you now know from day 57, there are a few deployment methods, and numerous platforms to deploy to. This walkthrough covered the simpliest deployment to one of the most popular platforms, VMware vSphere. For those of you who want to try out OpenShift, you have two options, you can now deploy a single node OpenShift environment running on your local machine, you can run OpenShift sandbox via their website, or you can run OKD, the open-source version in your home lab. Or stick with a trial of the enterprise software like I have.
In day 59, we will cover application deployment in a little more detail, and look start to look at Security Contraints Context (SCC), the out of the box security features of OpenShift which enhance further upon the older PodSecurityPolicies from Kubernetes. SCC is sometimes a little hard to get used to, and be a source of frustration out of the box for many when getting started with OpenShift.
Resources
- vEducate.co.uk
- Red Hat OpenShift Commons - Community sessions helping steer the future of OpenShift as an open-source developed project - Link
- Red Hat Sysadmin Blog - Deploy and run OpenShift on AWS: 4 options
- Red Hat OpenShift Documentation - Installing a cluster quickly on Azure
- YouTube - TAM Lab 069 - Deploying OpenShift 4.3 to VMware vSphere (UPI install)
- Red Hat OpenShift Container Platform 4.10 on VMware Cloud Foundation 4.5
