mirror of
https://github.com/yairm210/Unciv.git
synced 2025-01-10 23:37:31 +07:00
123 lines
8.5 KiB
Markdown
123 lines
8.5 KiB
Markdown
# Building Locally
|
|
|
|
By the end of this guide, you will have Unciv running locally from code, so you can make changes and test them locally.
|
|
|
|
## With Android Studio
|
|
|
|
- Install [Android Studio](https://developer.android.com/studio) - it's free and awesome! Be aware that it's a long download!
|
|
- Install Git, it's the way for us to work together on this project. UI is optional, Android Studio has good Git tools built in :)
|
|
- Getting the code
|
|
- Create a [Github account](https://github.com/join), if you don't already have one
|
|
- [Fork the repo](https://github.com/yairm210/Unciv/fork) - this will create a "copy" of the code on your account, at `https://github.com/<YourUsername>/Unciv`
|
|
- Load the project in Android Studio
|
|
- File -> New -> Project from Version Control -> GitHub
|
|
- Enter your GitHub username and password
|
|
- Select the repository and hit clone - The GitHub repo will be created as a new project in Android Studio.
|
|
- Gradle will attempt the initial sync. If this is your first time with Android Studio, this may require you to accept the Android Build-tools licenses, which works differently on every device, so search for your OS-specific solution.
|
|
- A new install may not be able to do the initial sync - this comes in the form of `Unable to find method ''void org.apache.commons.compress.archivers.zip.ZipFile.<init>(java.nio.channels.SeekableByteChannel)''` errors when you try to sync. If you have this problem go into File > Settings > Appearance & Behavior > System Settings > Android SDK
|
|
- Click "SDK Platforms"
|
|
- Click "Android 13 (Tiramisu)"
|
|

|
|
(Optionally, you can save some space by selecting 'Show Package Details' and choosing the Platform SDK only, without Sources or system Images)
|
|
- Click "SDK Tools"
|
|
- Select "Show Package Details" in the bottom right
|
|
- Choose version 33.0.2 under "Android SDK Build-Tools"
|
|

|
|
- Click "Apply"
|
|
- Restart Android Studio
|
|
- In Android Studio, Run > Edit configurations (be sure the Gradle sync is finished successfully first).
|
|
- Click "+" to add a new configuration
|
|
- Choose "Application"
|
|
- Give the configuration a name, we recommend "Desktop"
|
|
- Set the module classpath (the box to the right of the Java selection) to `Unciv.desktop.main` (`Unciv.desktop` for Bumblebee or below), main class to `com.unciv.app.desktop.DesktopLauncher` and `$ProjectFileDir$/android/assets` as the Working directory, OK to close the window
|
|
- It _may_ be useful to set some VM options - activate the field in the run config editor with Alt-V or via the Modify Options menu, then add `-Xmx4096m -Xms256m -XX:MaxMetaspaceSize=256m` to allow a debugged game a little more memory. Or, use the `-DnoLog=` or `-DonlyLog=` options to control console logging. See the [Log.kt](https://github.com/yairm210/Unciv/blob/master/core/src/com/unciv/utils/Log.kt) comments for details.
|
|
- If you get a `../../docs/uniques.md (No such file or directory)` error that means you forgot to set the working directory!
|
|

|
|
- Select the Desktop configuration (or however you chose to name it) and click the green arrow button to run! Or you can use the next button -the green critter with six legs and two feelers - to start debugging.
|
|
- A few Android Studio settings that are recommended:
|
|
- Going to Settings > Version Control > Commit and turning off 'Before Commit - Analyze code'
|
|
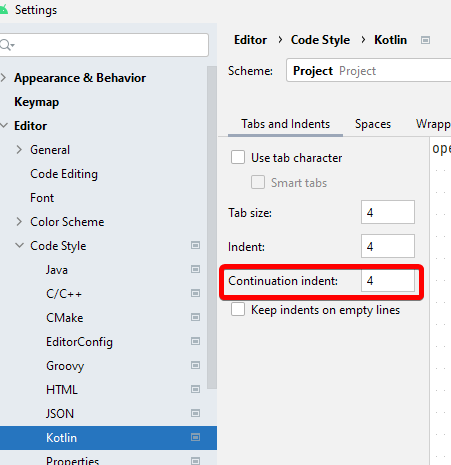
- Settings > Editor > Code Style > Kotlin > Tabs and Indents > Continuation Indent: 4
|
|

|
|
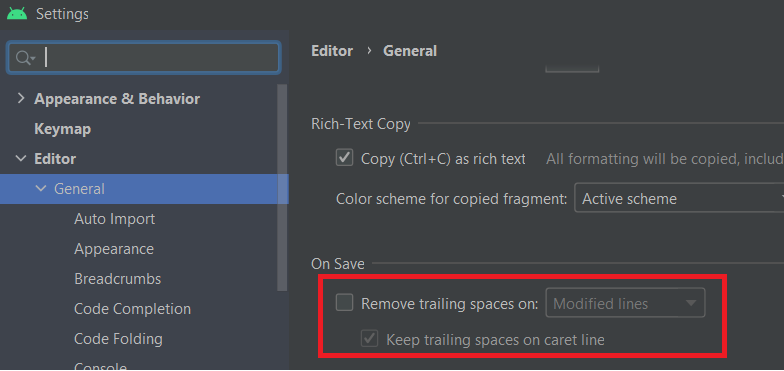
- Settings > Editor > General > On Save > Uncheck Remove trailing spaces on: [...] to prevent it from removing necessary trailing whitespace in template.properties for translation files
|
|

|
|
- Right-click the `android/assets/SaveFiles` folder, "Mark directory as" > Excluded
|
|
- If you download mods do the same for the `android/assets/mods` folder and any other files you may create while testing that do not belong in the public project.
|
|
- This [disables indexing](https://www.jetbrains.com/help/idea/indexing.html#exclude) for performance.
|
|
|
|
Unciv uses Gradle to specify dependencies and how to run. In the background, the Gradle gnomes will be off fetching the packages (a one-time effort) and, once that's done, will build the project!
|
|
|
|
Unciv uses Gradle 7.5 and the Android Gradle Plugin 7.3.1. Can check in File > Project Structure > Project
|
|
|
|
> Note: advanced build commands (as described in the next paragraph), specifically `gradlew desktop:dist` to build a jar, run just fine in Android Studio's terminal (Alt+F12), with most dependencies already taken care of.
|
|
|
|
## Without Android Studio
|
|
|
|
- Ensure you have JDK 11 or higher installed
|
|
- Clone the project (see above initial steps)
|
|
- Open a terminal in the Unciv folder and run the following commands
|
|
|
|
### Windows
|
|
|
|
- Running: `gradlew desktop:run`
|
|
- Building: `gradlew desktop:dist`
|
|
|
|
### Linux/Mac OS
|
|
|
|
- Running: `./gradlew desktop:run`
|
|
- Building: `./gradlew desktop:dist`
|
|
|
|
If the terminal returns `Permission denied` or `Command not found` on Mac/Linux, run `chmod +x ./gradlew` first. *This is a one-time procedure.*
|
|
|
|
If you get an error that Android SDK folder wasn't found, install it by running:
|
|
|
|
`sudo apt update && sudo apt install android-sdk` (Debian, Ubuntu, Mint etc.)
|
|
|
|
Then, set the SDK location in the `local.properties` file by adding:
|
|
|
|
`sdk.dir = /path/to/android/sdk` - for example, `/usr/lib/android-sdk`
|
|
|
|
If during initial launch you get an error that the JDK version is wrong, install the JDK from [here](https://adoptium.net/temurin/releases/).
|
|
|
|
> Note: Gradle may take up to several minutes to download files
|
|
After building, the output .JAR file should be in `/desktop/build/libs/Unciv.jar`
|
|
|
|
For actual development, you'll probably need to download Android Studio and build it yourself - see above :)
|
|
|
|
## Next steps
|
|
|
|
Congratulations! Unciv should now be running on your computer! Now we can start changing some code, and later we'll see how your changes make it into the main repository!
|
|
|
|
Now would be a good time to get to know the project in general at [the Project Structure overview!](Project-structure-and-major-classes.md)
|
|
|
|
### Unit Tests
|
|
|
|
You can (and in some cases _should_) run and even debug the unit tests locally.
|
|
|
|
- In Android Studio, Run > Edit configurations.
|
|
- Click "+" to add a new configuration
|
|
- Choose "Gradle" and name the config, e.g. "Unit Tests"
|
|
- Under "Gradle Project", choose "Unciv" from the dropdown (or type it), set "Tasks" to `:tests:test` and "Arguments" to `--tests "com.unciv.*"`, OK to close the window.
|
|
- Select the "Unit Tests" configuration and click the green arrow button to run! Or start a debug session as above.
|
|
|
|
### Linting
|
|
|
|
Detekt checks for code smells and other linting issues.
|
|
To generate Detekt reports:
|
|
|
|
- Download [detekt-cli](https://github.com/detekt/detekt/releases/latest) (the zip file) and unzip it
|
|
- Open a terminal in the Unciv root directory and run one of the following commands to generate the report. NOTE: If you're using Windows, replace `detekt-cli` with `detekt-cli.bat`.
|
|
- For warnings: `PATH/TO/DETEKT/detekt-cli --parallel --report html:detekt/reports.html --config detekt/config/detekt-warnings.yml`
|
|
- For errors: `PATH/TO/DETEKT/detekt-cli --parallel --report html:detekt/reports.html --config detekt/config/detekt-errors.yml`
|
|
- The report will be generated in `detekt/reports.html`
|
|
|
|
### UncivServer
|
|
|
|
The simple multiplayer host included in the sources can be set up to debug or run analogously to the main game:
|
|
- In Android Studio, Run > Edit configurations.
|
|
- Click "+" to add a new configuration
|
|
- Choose "Application" and name the config, e.g. "UncivServer"
|
|
- Set the module to `Unciv.server.main` (`Unciv.server` for Studio versions Bumblebee or below), main class to `com.unciv.app.server.UncivServer` and `<repo_folder>/android/assets/` as the Working directory, OK to close the window.
|
|
- Select the UncivServer configuration and click the green arrow button to run! Or start a debug session as above.
|
|
|
|
To build a jar file, refer to [Without Android Studio](#Without-Android-Studio) and replace 'desktop' with 'server'. That is, run `./gradlew server:dist` and when it's done look for /server/build/libs/UncivServer.jar
|